Sunday, September 29, 2013

Go Gold!

SEPTEMBER 2014 UPDATE:  Even though I wrote this post last September, every word of it still applies.  Please read, click on some links, and help support Childhood Cancer Awareness Month any way you can.  Also, take a look at lovely Sadie today, who is counting down the days to her LAST CHEMO treatment this fall!  Go Sadie!!!


___________________________________________________________________

It's the end of September, and I'd like you to ask yourself a question.  Do you know what Go Gold means?  If so, hooray!  If not, let's get you acquainted.

September is Childhood Cancer Awareness Month.
Did you know this???
 
I doubt there is anyone reading this who hasn't been touched by cancer in some way.  We've all either watched a loved one suffer with, triumph over, or lose their life to this terrible disease.  But really, could there possibly be anything worse than watching any of our babies go through this horror?  This should be everyone's worst nightmare, and unfortunately, some are actually living it in reality. 
 
There have been some great crafty and DIY groups that have recently been trying to do their part to bring awareness to childhood cancer.  Take a look:
 
 
Etsy has a page dedicated to everything gold.  Who doesn't love Etsy??


Peach's Neet Feet is a non-profit group where artists donate their time to paint and decorate shoes for children with disabilities and fighting serious illnesses.  Peach's shoes give kids an extra boost of confidence and love when going in for procedures and treatments...they're the Superman Cape of shoes!  Awesome!! 
 
Click HERE to view the website.
How cute are those shoes??
 
Even Zazzle has pediatric cancer awareness pieces...yay!
 
Don't worry, there's a lot more than buttons!
Description Closeup
 
If you're not familiar with Zazzle, it's an online retailer where anyone (yes, you!) can upload images to thousands of types of products (tshirts, mugs, buttons, etc) and have it made just for you, or to sell on the Zazzle website.  Great DIY option for those less handy and more techy in nature.  If you're looking to sell things and donate to pediatric cancer awareness groups, even better!!!
 
There are way too many little ones living and dealing with cancer every day, and we should be doing our best to find cures and ensure that they can live long and healthy lives. 
 
Let me introduce you to one such little gem.  Her name is Sadie.  She lives in my hometown, and her grandmother was my fifth grade teacher.  Shoutout to great teachers everywhere, especially Mrs. Crary!! :)  Last year, she was diagnosed with leukemia, and she's been an amazingly brave little one throughout her entire ordeal. 
 
Little Miss Sadie
 
 
See all those beads in the upper right picture?  Each bead represents one needle poke, spinal tap, chemo dose, etc. that Sadie has had to endure.  And she does it with a smile.  I know there are a lot of us who donate locally to families we know dealing with pediatric cancer.  If you don't know someone directly affected by it, but want to help out, here's a few good places to send your donations.  Click on the links for more information.


Thanks for taking the time to help out Sadie and her friends!! xoxo


Wednesday, September 25, 2013

That Was a Wheely Good Time.

I know, the title's a bit of a stretch, but bear with me.  Today, we're talking about driveways!  Please, calm yourself, I know you're excited.

Last month, I decided that the driveway desperately needed to be sealed.  Never mind that it hadn't been done in the 6 years we've lived in the house, or had even really been on my DIY radar.  August hit, and I needed it done, and I needed it done NOW.

So neglected.

I started researching the various methods of DIY driveway sealing, and knew that I needed to do some serious prep work before I could even think about getting to the sealer.  The year we moved in, I did use indoor/outdoor caulk to seal the line where the foundation of the house met the driveway.  Certain areas tend to pool with water when it rains, and I didn't feel the need to have a pool in the basement.  I'm not Donald Trump.

Six years later, that caulk was peeling up, so I ripped it out.  Took all of about 2 minutes.  Done.

Gross caulk.  Came right out.

I went to Home Depot (Sorry Lowe's, I enjoy you, but you lost out on this one), as they had a fairly new product for consumer use there...tar on a rope.  This tar was literally a pile of rope with plastic flammable film wrapped around it.  Time to fire up the butane torch.  Yesssss. 

Rope tar...officially known as Pli-Stix.

Problem one occurred shortly after firing up the torch.  While the directions and website tutorials give great instruction on the actual process of using this rope tar, they leave out the fact that you do need an attachment for your torch that allows you to leave the propane canister sitting upright while you wave your wand of fire around melting pools of tar.  Without it, the torch kept sputtering out every time I tipped it at an angle to melt the rope.  Back to Home Depot I went for the $15 attachment.  Once this problem was solved, the business of playing with fire really got serious.  I burned the house.  Whoops.  Solution?  Paint over it with driveway sealer.  Bingo!  Yep, I'm a professional problem solver.

Burnt the wall.  Rut ro.

Problem Solved.


Once I ran out of my 60 feet of rope tar, I turned to my big jug of crack filler.  (Feel free to insert your own inappropriate crack filler jokes here.  There's too many running through my head to pick just one.) I used this to fill the smaller cracks on various parts of the driveway.  I probably could have used about 5 gallons of this stuff if I took the time to fill every. single. crack., but I didn't.  This driveway isn't going to be completely saved by my novice skills.  Its life has just been slightly extended.

I forgot to take a picture of this stage.  You can look at Puppy Margot, instead.

There was also one part of our driveway that had seriously eroded and crumbled, leaving a huge pothole.  When it rained, this filled up with about 3-4 inches of standing water- it came up to my ankles.  Not good.  I bought seven bags of asphalt patch, and got to work.  Each bag was dumped in separately, and tamped down with an asphalt tamper.  (Not really sure if that's the actual name of the tool, but we're sticking with it.)  Our former neighbor had double sets of all of her tools when she and her husband got married several years ago, so I got to be on the receiving end of a few things.  Free stuff is awesome!!

Falling apart.  Big time.

Seven bags of patch later...


After tamping the patch down by hand, Dave and I put a few boards over it, and drove the car back and forth on it a bunch of times to pack it down even more.  We probably could have used a few more bags, but I'm not a professional, and I'm not sure we could have made it completely even, anyway.  This fix was just to slow the crumbling speed of the whole driveway.

Once all of these fun jobs were done, the waiting game began.  The directions for the patch stated that we should wait at least two weeks for it to cure before putting sealer on it.  Tick, tock, tick tock.

DING!  The sealer was the easiest part of all.  Pure painting, nothing more.  I used a brush to cut in the edges while Dave used a roller on a long stick to cover the rest of the driveway.  (If your driveway isn't smooth, and has pits/eroded areas, use the roller, not the squeegee recommended by the sealer companies.  It's much easier.)  Pretty easy work....and then disaster struck.  In the form of rain.  The forecast had predicted a 30% chance of "spotty showers" for late in the afternoon.  The reality?  Downpours at 1:00pm.  Half the driveway washed down the sidewalk and into the street.  Damn it.


Tape up those edges that you don't want sealer on!


Stealth shot.

Sooo...we waited a few days for clear skies, brought out the roller again, and repainted the sealer onto the front half of the driveway that hadn't been dry when the rain hit.  Our driveway is now dark and beautiful, with a hint of roughness to it...much like Idris ElbaHello, Sir.

If you're looking for a supply list rundown, here it is:

4 large buckets of Latexite Airport Grade Sealer
2 packages of 30 ft. Pli-Stix (rope tar)
1 butane torch
1 wand attachment for torch
1 3/4 nap roller
1 3 inch brush (cheap, for cutting in)
7 bags SuperPatch (50 lb bags)
1 patch tamper
1 jug crack filler
Rubber gloves

These supplies covered my entire driveway, which is the made for the width of one car, and is probably about 60 feet long.  My estimate of the driveway is that it is about 500 sq feet.  Without the rain, we would have used probably 2.5 buckets of sealer, but we ended up using almost 4 complete buckets by the time we were done.  I'll be asking my local weatherman for a $30 reimbursement on the extra sealer used due to the rain. 

Done.  Not as nice as a new driveway, but better than it looked last month!


As I close this post, I'd like to give a huge shoutout to my husband, regardless of the fact that he does not read my posts.  He says, "I was there, I don't need a play by play of how we did the project".  Bless his heart for:
               A: Not getting in my way when I'm on a DIY roll, and
               B. Lending a hand when I ask him for his muscles.  High fives for fantastic husbands!  (And sealed driveways...that comes in at a close second;)

Happy Hump Day, peoples!

Tuesday, September 17, 2013

Be Still my Beating Heart (if I eat any more of this...seriously.)

The weather is getting too cold for these old bones.  When the temps dip below 85 degrees, you'll most likely find me in sweatshirts, jeans, and knee high socks.  No, I'm not joking, yes, I'm anemic, and yes, I take iron supplements.  Never fear, moms and worrywarts, I've got it covered.

As I write this, it's a sunny 65 outside, but I've got my space heater on MAX and I'm pretty sure that the tights I'm wearing under my sweatpants are melting to my legs.  While I don't really like the inevitable decline in outdoor temperatures, it does make me excited for a few things, the most noted of which includes all things COMFORT FOOD.  Stews, soups, crock pot meals, casseroles....I love them all.  This past weekend meant the experimentation of a new recipe on the BGE (Big Green Egg).  If you haven't read about my love for the BGE, go back and read up here.

Dave and I decided to make mac and cheese (aka Heart Attack On a Plate).  And oh, did it turn out glorious!!!  I researched a few BGE mac and cheese recipes online, but this one from The Pioneer Woman really stole my heart.  YUM.  I followed her directions, and substituted/added a few of my own things.  I didn't take pictures of everything I was doing because 1.  Food blogger I am not, 2.  I do not like to measure exactly, and 3. It is impossible to temper eggs with a roux while simultaneously taking pictures- I do not have 5 hands.   I just wanted to share with you the gloriousness that is the BGE and everything that comes out of its cavernous depths.  UH-MA-ZING.  For real.  No joke.  I wish I could give you a taste through the computer.  Did you ever go camping as a kid and remember how everything that your parents cooked over the campfire just tasted so darn good?  That excitement you felt over making hot dogs on a stick, or roasting marshmallows?  The BGE is that excitement for GROWN UPS.  I can't stop using capitals, I'm so in love.  Sigh.


Sorry, I got too excited to actually start making this, and was less excited about taking pictures of all of my ingredients.  That's all you get.

The original recipe called for a pound of pasta, but I knew better...Dave and I needed MORE.  I made about a pound and a half, and just adjusted my other ingredients accordingly.  We had enough for 2 dinners and one lunch this way.  


Whisk that roux!

Mixing.
The Pioneer Woman's recipe called for whole milk.  I bought a small container (1 cup size) of heavy cream, and combined it with the skim milk I keep in the fridge.  No need to go out and buy a bunch of whole milk just for this recipe.

I also added some ground mustard.  I saw it on another recipe and thought, Why not?

If you don't love cheese, we can't be friends.

After looking through a few recipes for mac and cheese, I decided to use a mixture of extra sharp cheddar, fontina, and a wedge of parmesan.  I didn't measure, I just shredded.  This looked like an acceptable amount, so I stopped shredding.

Ready to make love.  It's a match made in heaven.

Consummating the mac and cheese marriage. 
I forgot to take a picture, but I added some crumbled bacon into this feast.  That was a good decision.  A really good decision.  I also added some nutmeg, salt, and pepper to the cheese mixture.  Trust me- you want to add the nutmeg.

Don't forget to top it off!
 I left a handful of cheese out of the recipe and combined it with a palmful of panko bread crumbs to spread on top.   If you don't have panko bread crumbs in your cupboard, go out and buy some.  They have a much better texture than regular breadcrumbs, which can sometimes end up like flour if you get a cruddy brand.  You want crunch!!


Oh myyyy.  No picture exists of this amazingness "styled" on my plate.  It was in my belly too fast for that nonsense.
We cooked the mac and cheese in the BGE for a little over a half hour at a 350 temp.  Would this recipe still be amazing in the oven?  I'm sure it would.  Was it even more amazing in the BGE?  Yep!  The BGE gave the whole thing a wonderfully fire-roasted smokey flavor.  Unbelievable!  Dave and I agreed that this is a once a year recipe, though.  I'm sure our arteries are thanking us.

Saturday, September 14, 2013

Sit Down, Already!!

Dave and I went to the mall last weekend, and as normal, we parked next to Crate and Barrel and used their entrance into the mall.  Periodically, the store will have a small section where they sell their floor samples of rugs, furniture, and accessories for a greatly discounted price.  Bingo!  It was one of those days!  As we walked through, a few things caught my eye, but had my husband's eyes rolling.  He can almost see the gears turning in my head, churning out smoke and DIY ideas at an alarming rate.

The big ticket item I really wanted to buy, but ultimately walked away from, was a $1,700 kitchen table marked down to $199.  Nope, not a typo.  ONE HUNDRED AND NINETY NINE dollars for a beautiful wood table.  I tried to talk Dave into it, not because we needed another table, but because I thought that I could buy it, slap it on Craig's List for at least $500, and make a quick buck.  There was absolutely nothing wrong with the table, but my better judgement won out and I left the table behind.  Dave always thinks someone is going to answer my Craig's List ads and turn out to be the next Craig's List Killer, so in deference to my safety, I let him win this one.  He did, after all, just help me seal a driveway that was promptly rained on and half washed away.  I kind of owe him one.

Never fear, though, I did not go home empty handed.  This single, lonely, solitary chair was sitting all by itself, priced at $29, marked down from $179.  All because it didn't have the accompanying cushion to go with it.  Seriously??  I snapped up that baby, promising to use it and love it and treat it with care.  Dave just turned around in the car and kept saying, "Why, for the love of God, is there a metal chair on my leather seats?"  What a good man to put up with my crazy habits and tendencies.  He really is a gem.


This is where the chair will go.  It can't stay black, though, no sir!

So, the chair got dropped off in the garage with a blue tarp to await its new color and fate.  I couldn't just leave it black- it wouldn't look right in the guest room.  I have a framed map of our city in the room that I love the color of- it's not quite gold, silver, or rose gold- kind of a pretty mix of all three.  Unfortunately, the spray paint companies don't make rose gold spray paint...what the hell Rustoleum??  Get on that, please!!  I don't have a professional paint sprayer, and the chair isn't worth the cost of going all out for something like that.  


See the frame behind the cans?  Hoping I can create something similar.

So, a trip to Lowes for spray paint, and the transformation began.


Two coats of copper.

One light, airy coat of nickel.


I started out with a base coat of Vintage Copper, followed by a light dusting of Satin Nickel, and a coat of clear protective spray to protect it from scratches.  I probably should have done another dusting of the nickel, because the chair darkened up again when I put the clear coat on it.  I think I'll live with it for a bit to see if it still bothers me in a week.  If so, back to the garage it will go for one more coat.


In its new home.
Close up of final product.  Darker than the frame I was trying to match, but not a bad look.


Either way, for less than $50, I have an awesome new chair that fits the decor of the room much better than the slipcovered apartment chair that has resided there for the past 6 years.  I'm sure it will be moved around through multiple rooms and multiple houses over the next few decades, and will probably change colors along the way (If the room had any stitch of yellow in it, that chair would have been painted bright as a canary.  True Story).  For now, it will take up residence in the guest room.  Please feel free to come visit and plop your behind in it.


Before:  Too much fru-fruness for me.


After: Minimalist, but still needs a cushion or pillow to add some flavor.


Friday, September 6, 2013

It's OK to be regular.

Disclaimer...if you're looking for a DIY post, this isn't it.  It's just a rant.  Read on or click out.  Your choice:)

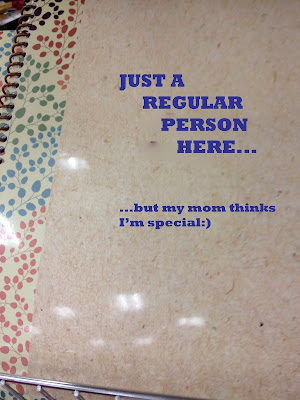
Last week, I went to Target to grab a few things, and saw this notebook sitting at the end of the school supplies aisle.  EEK!

WHAAAAAT??

I intended to just post the picture with a funny little quip, but then I got thinking.  Why isn't it ok to be regular?  I named my blog after the word, and did so because I'm ok with being a regular person in a regular house with a regular job in a regular neighborhood.  

I think we've all gotten carried away with the mentality that everyone is special.  Not just special to their moms, dads, family, and friends, but super special in the I'M SO AMAZING THAT I AM DESERVING OF ALL OF THE WORLD'S POSSESSIONS AND LOVE JUST FOR BEING BORN type of special.  We've all seen it, and many articles have been written and t.v. specials have been run about the I deserve a huge trophy just for playing CYO soccer culture that seems to be pervasive with today's youth (and their parents).  

I'm pretty sure that every generation has complained about something that's "wrong" with the next generation down.  Despite my complaints, I am all for making little ones feel special about certain things- maybe they are good at art, or can run fast, or just give the best hugs in the whole wide world.  It's ok to let kids know that they are special to you for a variety of reasons.  

Unfortunately, in the harsh reality of the world (and especially in the high school and college world, as this college ruled notebook was intended for), our babies really aren't that special to anyone not in our inner circle.  And that should be ok.  Our little ones WILL grow into teenagers and young adults who need to be prepared and armed with the knowledge that while someone at home will always be there to cushion the blow of the real world whacking them in the face, that they WILL get whacked in the face by life.  The world doesn't owe them a favor just because they are breathing.  

During my teaching years, I frequently came across this mentality- the parent and 17 year old girl who were both convinced that she would become a fashion designer (despite the fact that she could only draw stick figures...), the 5'2" 12th grader whose plans were to make his money in the NBA, and the senior whose mom came in and strong armed the counselor into sending her daughter's application to Harvard, with her ACT score of 13 attached it it.  The national ACT average from 2012 was a 21.1. We laugh at little ones who share these dreams with us, and we pat them on the head and tell them, "Of course you can do that!".  But it's not so cute when young adults think this way and still actually believe it.  It's like the two year old with a lisp that we keep telling to say "dump truck".  It's funny, and we all howl with laughter, but when he's 12 and yelling "dumb f*@!", it's horrendous.  

While these stories are only anecdotal, my teacher friends across the US all have had similar stories to share, and I'm sure they could add pages and pages more of the same type of thing.  Why aren't we pulling on our kids' strengths and teaching them that it is ok to be regular, that the world desperately needs the plumbers, the teachers, the mail carriers?  

We don't need to be special to live happy, fulfilling lives.  If everybody's special all the time, then nobody's actually special, right?  Except to our mommas...to them, we are the most special beings on the face of the planet.  If Target made a notebook that looked like this, then I would buy it in a heartbeat:

Now that's a little more accurate.

Come on Target, can we make it happen?

Tuesday, September 3, 2013

Hemming and Hawing

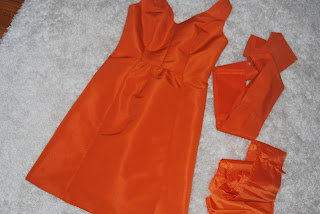
Well, I've hemmed and hawed a long time over what to do with this dress.
It's orange.  It's happy.  It's too long.

I wore it a few years ago to a wedding, and while I love the color, I didn't love the length.  It hit mid calf, which for ladies, is one of the worst lengths for dresses.  It makes your calves look wide, and your legs look short.  Every woman's dream, right?  I've tried it on several times before going to a dressy event, and always put it back in my closet.  It just wasn't right.

Today, instead of continuing to hem and haw over the dress, I decided to just suck it up and HEM IT.  I don't know why such seemingly simple fixes sometimes take so long to get done.  Once you do it, you're really ticked you didn't do it sooner.

If you have any sewing skills at all (and the time!), hemming is one of the simplest things you can do yourself.  From start to finish, this job took me about 1.5 hours, since I already had all of the supplies I needed.  


You're going to need more than this to shorten a hemline, but I had to prove that I was ready to go with my supplies, right?

This dress had a lining to it, so I actually had to sew two hems- no biggie.  Just make sure the lining is at least an inch or two shorter than your outer hem.  The original hemline of the dress was sewn with an invisible stitch over a piece of ribbon to hide any raw fabric edge without creating a bulky, double folded seam.  I decided to reuse the ribbon and copy the original.  If it ain't broke, don't fix it.

Original hems.


After measuring and cutting my fabric (I cut it a half inch longer than I wanted the full hem length to be), I used a seam ripper to rip the ribbon hem off so that I could reuse it.  I then sewed the ribbon onto the raw end of the dress, and folded it over, ironing as I went to create a sharp line.  

Chalk it up to good measuring skills...heh heh heh.  Good joke.

Double fold the lining to sew a neat seam.
Sewing the ribbon to the dress.
Fold the new edge over and PRESS the hell out of it.

I then used matching orange thread to sew an invisible hem onto the new length of the dress.  PRESTO..dress fixed.  

An invisible stitch should mean that you can't see it from the outside of the garment.  But what good does it do to take a picture of something you can't see?  EXACTLY.

I'm really not here to give you a full blown tutorial on how to create an invisible hem, but it is the most important part of making a dress like this look good.  You could machine sew your hem, but if you don't like the look of seeing a hemline on the outside of your garment, an invisible stitch is the way to go.   If you really want to know how to do it, or want some practice, check out Youtube.  I'm not a teacher anymore, yo.

Now hits an inch above the knee- the CLASSY length for ladies over thirty.   Feel free to bolster my self image and reaffirm my descriptive word choices.
In related news, please don't stick your sewing needle into the couch cushion in an attempt to not lose it when you jump off the couch.  You'll really regret it when you sit back down in a slightly different spot than you got up from.  OUCH.

PS- If you just scoffed at everything I wrote and took pictures of, go take your clothes to a tailor.  Somebody's gotta put bread on their tables:)

Sunday, September 1, 2013

PinTWIST

Ha!  See what I did there?  Not Pinterest, but a TWIST on Pinterest.  Clever, I know.  Let me explain:  During one of my Pinterest browsings, I came across a pin that discussed how one lady has made an album of all of the weird, funny faced, horrible pictures of her family from vacations and holidays.  How mean, right?  And GENIUS.  

While I'm really not into going back through the files to create an entire album of horrible outtakes, I did think of something I could do that would incorporate the lighter side of this idea.  My twist:  googly faced and funny pictures of my loved ones to adorn my guest room. What better way to show friends and family you love them than decorate your walls with embarrassing pictures of them, no?

Several months ago, I did an overhaul on my guest room, painting walls and putting up wallpaper.  I filled some picture frames with pictures I already had printed off, just to get a head start on filling empty walls, which drive me NUTS.  I think it's a reaction to my mom always being afraid to hang things on the walls, But we'll have to make a HOLE in the wall to hang it!!  Sorry mom, I still love you, despite your weird phobia.  If you know you have rooms to decorate, and pick up cheap frames when you find them, it's always a good idea to have some of your favorite pictures already printed off and on hand so you can have a frame filler ready to go. When I print off pictures at Costco, I usually print off a handful more than I need of various pictures in different sizes, and then keep the stash on hand for fillers/changeouts so I'm ready to go.  Nothing kills the frame hanging mood more than getting it home, realizing you don't have a picture to put in it, and letting it sit on the floor for months while you constantly forget about finding a picture to fill it with.

Back to my guest room- let me fill your eyes and brains with some of the lovely pictures of my family that currently fill the walls.  I do plan on changing these out at least once or twice a year to spice it up, depending on which guests come to visit.  Some college pictures will be making an appearance sometime soon- I have no shortage of silly pictures from that bygone era to make me laugh.  I will also be on the hunt to get some funny pictures of more family members during my next visits with family....I'm looking at you, GRAM. 

A small vignette next to the bed. 
 Don't discount buying frames just because they are the wrong color- that's what spray paint is for!!  The oval frame came in a package of two and was black.  I attempted to use gold and green on these frames before getting irritated- they ended up white.  At some point, I might try to go back and gold leaf them just for fun- I feel like there's too much white, and I need a bit of variety on the wall.

Daddio circa 1983...what a gem.  And Mom in her blue dress behind him...ooh la la look at that shapely leg!

Family making faces.  Love.


What you can't see from this picture is the memory of my brother tying a helium balloon to the back of the kid's pants while the photo is being taken.  Oh memories.


This little lovely was a ROCK STAR when up close and personal with the animals!

We got some strange looks from people at the museum while taking several versions of this picture.  Priceless.

Love my ladies!


Funny faces at the park.

And in case you forget whose house you're in...you lovely hosts are here to remind you it's time to make love to the donuts.  There's no sense in making fun of others if I'm not going to make fun of myself, too!


And on that note, I'm out.  It's Labor Day Weekend, and it's time for a drink.  Cheers to weekend happiness!