
Here I am, though, back in the saddle to share my latest project. Several years ago, I started making hairclips and pins out of silk flowers with semiprecious stones and pearls as the centers. It was fun for awhile, and I even sold a few on Etsy, but each flower was just too time consuming for what I could charge for it.
Now, I just make them on request for friends and family who have special events to go to- it's much more fun that way, anyway:) Here's a few pictures of some of the flowers I've made in the past. Take a gander, and then we'll get to the meat of how it's done!


I usually start off with some dupioni silk. You don't need much to complete a flower- probably only a 12" square of fabric. I've tried to use other synthetic fabrics, but I found that dupioni silk just works best. Plus, it's pretty, and you can usually find it in quite an array of shades at your fabric store!
To begin, I cut petals out of my fabric by folding over strips and cutting "u" shapes along the fold. You can make your petals more pointed on the ends, or fatter, depending on what shape of petals you want for your flower.
 |
| I cut a few smaller petals after I took this picture, but I only ended up using about 25 petals. It's ok to have extra left over!! |
After cutting out petals in various sizes, ( I usually cut out about 30 petals, but it really just depends on my level of patience that day), it's time to bring out the rice. That's right, I said RICE. Yep, the kind you eat with your mu shu pork.
 |
| Umm, just try not to spill the rice all over your counters and floors. You don't need a 15 minute delay while you clean up and try to stop the dog from licking dry rice off of everything. Whoops! |
The rice is going to be used to mold our petals. We don't want flat petals, do we? That wouldn't be realistic. I sprayed the petals with fabric stiffener, and then plopped them in my containers of rice, mashing them down so that they were partially submerged and crinkled up a bit.
 |
| Stiffen Quik? SO. MANY. JOKES. |
Then, I popped those babies into the microwave for 1 minute. The directions on the fabric stiffener say that you can either wait an hour for the liquid to dry, or microwave it. Through some trial and error, I've found that even microwaving the petals doesn't mean that they are ready to go any quicker than letting them air dry. I still leave the petals in the rice until the whole bowl has cooled (about 20 minutes), before taking them out. Otherwise, the petals won't hold their shape as well.
 |
| See those white petals stuffed in that white rice? They're there, I promise!! |
Once the petals have been formed, it's on to the fun step...beading!! I have a pretty nice selection of glass beads, semi precious stones, freshwater pearls and Swarovski crystals that I use to decorate the centers of my flowers. You can definitely use the cheaper plastic beads from the craft store, but I think after spending the time to hand form petals out of silk, you might as well make the rest of your flower special too, am I right?
 |
| Molded petals. Not to be confused with moldy petals. These are perfectly clean. |
As it's really not that fun to push a needle and thread through 30 layers of fabric in order to bead your flower, it's a good idea to just take the smaller, top layers of petals to attach the beads to. Here we go.

 |
| Keep on beading. When you think you're done, you're not. Add a few more. I'm really serious. |
Once the beads are sewn tight, then it's time to sew the top piece to the rest of the loose petals. Plop them together and sew a few double threaded stitches.

 |
| It's coming together now!! |
Almost done!! After I'm finished with the flower itself, I cut a small piece of matching felt, and attach that to the back of the flower. I've done this in two ways in the past: sewn the felt on, and hot glued it. Both methods work just as well. I would not, however, recommend gluing all of the petal layers together. That doesn't work out so well.
 |
| Alligator clip (chomp chomp), felt, back of flower |
Last but not least, I attached an alligator clip to the felt with my glue gun. This step is personal preference in what type of clip you choose to attach...there's lots of options of clips, barrettes, combs, and bobby pins that all work well. Just choose what works best for you!
 |
| SO CLOSE TO BEING DONE. |
What do you think? Worthy of a wedding or special event? I think so!
 |
| Freshwater pearls, pink coral, and glass beads. No plastic here, no sir! |
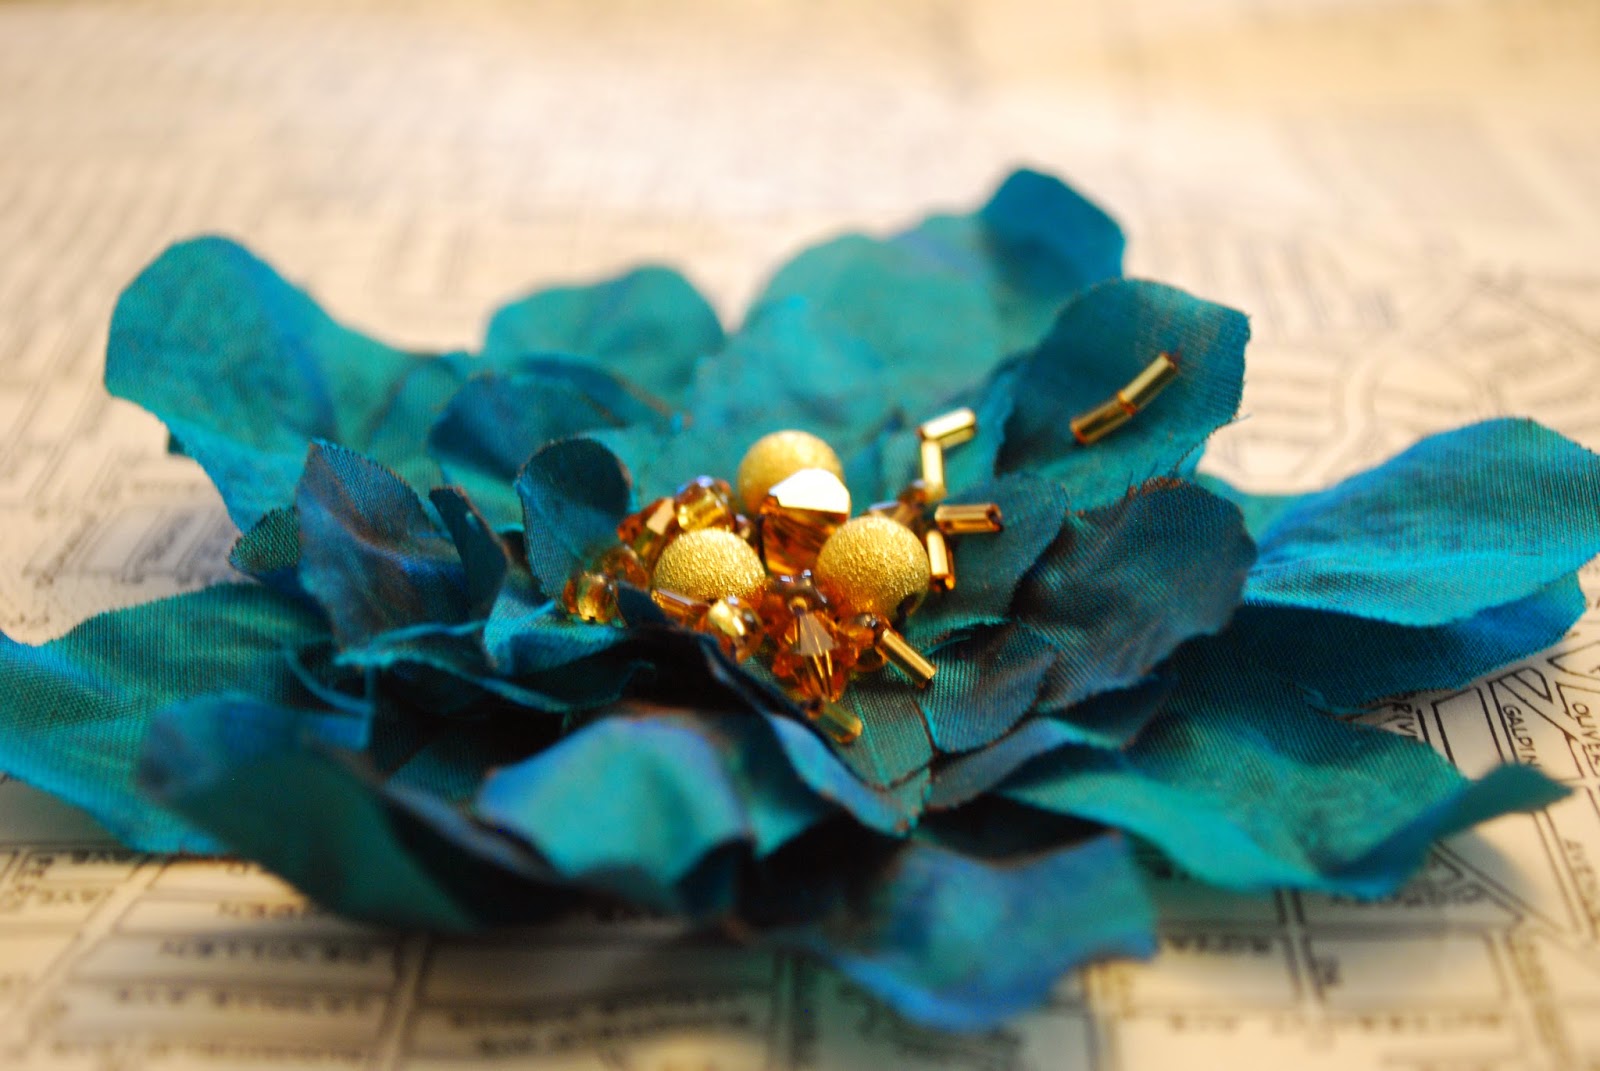
 |
| This lovely flower has been sent to my dear friend Anne, who will be pairing it with a pinkish fuschia bridesmaid's dress and gold heels. This perfect accessory will now complete the look!! |